GeekZilla
Create your own torrent download server - Part 2
Creating a torrent server - Part 1
Okay, if you've got uTorrent running and accessible via a browser (locally and remotely) we're ready to install it as a Windows Service.
Install uTorrent as a Windows Service
We need a couple of tools to do this, I downloaded them with the Windows 2003 Resource Kit. The two files are
instsrv.exe and srvany.exe
and available to download on this page.
Copy these files into the program directory you have created for uTorrent. Get a command prompt by Start -> Run and entering CMD at the prompt.
At the command line get into the uTorrent directory using the cd command. Then run the following command. Where uTorrent is the name of your uTorrent folder in Program Files. If you've installed this elsewhere amend the path accordingly.
instsrv uTorrent "C:\Program Files\uTorrent\srvany.exe"
This creates the appropriate Registry Entries to manage the service. Srvany.exe acts as a wrapper to the uTorrent.exe and allows it to be managed as a Windows Service.
Okay, now we need to make a tweak to the registry, to basically map the path of the uTorrent.exe that Srvany.exe has to manage. Do this by creating a .Reg file using notepad
Paste in the code below.
Windows Registry Editor Version 5.00

[HKEY_LOCAL_MACHINE\SYSTEM\CurrentControlSet\Services\uTorrent\Parameters]
"Application"="C:\\Program Files\\utorrent\\utorrent.exe"
You can navigate to the registry and make the same change. You've now done enough to get an entry in the Windows Services Database and you can now access it via the Services section of Microsoft Management Console.
Once in Services you can configure the User Account that uTorrent runs under when it runs as a service. See below. My service is already running in these shots.
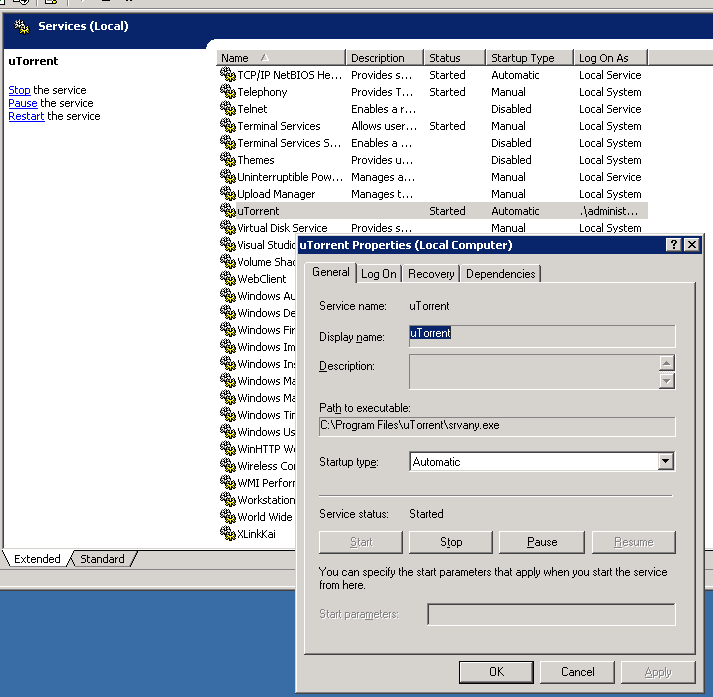
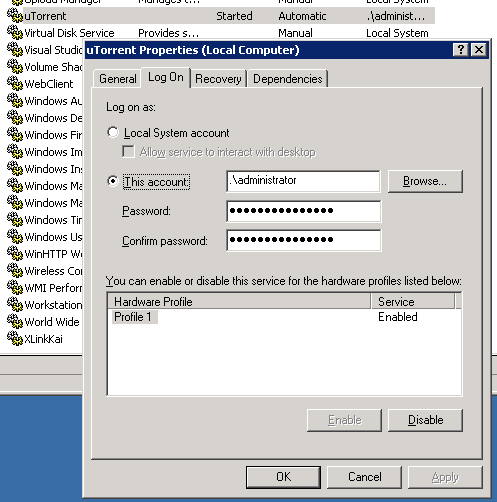
You need to configure it so that it starts automatically (screen shot 1), and make sure that the user it logs on as is the same one you configured uTorrent with in part 1.
Now start it. Use MMC and simply click start. You can do it from the Command line by typing Net Start uTorrent
The service should start, and if you fire up a browser you should be able to access uTorrent's WebUI via the URL with the UID, PWD and Port you configured uTorrent with in Part 1.
That's it, you now have a torrent server that you can use for your downloads without having to keep the box logged on with a UserID.
I was also running PeerGuardian2 from Phoenix Labs on my old desktop, to protect my privacy 
Using the same tools I configured this as a service too.
I'm not a huge online gamer, but occasionally I play Halo 2 on the Kai network. My Xbox connects to the Kai network via the XLink Kai engine on my server. Previously this ran on the desktop, but with some effort I eventually got it running as a service. You can see it at the bottom of my service list on the screen print above.
I hope these articles were useful, and if you weren't using uTorrent you are now.

A self confessed Microsoft bigot, Paul loves all Microsoft products with a particular fondness for SQL Server. Paul is currently focusing on Web 2.0 patterns and practices and is always looking for better ways of doing things.
I love the .net platform, and I find it to be the most productive toolset I have used to date.
Comments
Swehawk
said:

Great article, thanks! However, in order for uTorrent-service to start on my winXP home-system, I had to copy all files in "C:\documents and settings\application data\username\uTorrent\" to the installation directory of uTorrent. I also tried letting uTorrent-service run as "my own account" but it would not start, so I left it running as "system" which is the default. Now, with the proper firewallsettings, I can manage my torrentclient from work (or any internet-pc). I have yet to figure out how to add a new torrent remotely.
marshp3
said:
If you click the blue plus sign on the left hand side of the tool bar when you have uTorrent open in the browser you can add torrents.. You can do this by downloading a torrent file to your desktop and uploading (right click Save As) or simply put the URL into the dialog box
e.g http://www.torrentspy.com/download.asp?id=2888965
Hope this helps..
Chris from Dallas
said:
This worked expect that I use a separate file server meaning the service runs on the one comp and all the files are stored on another. This works fine running normally. I just specify the share in the utorrent config. When I start service and access through web app, all downloads are broken. My guess is the service doesn't have access the the share for some reason. I used the admin credentials for the service like you which should have access to the share but still no luck. Any ideas?
marshp3
said:
Chris, make sure your user has access to the share on the other machine. Also make sure that you have made the share writable not just read.
The problem is definately a permissions one. If you are still having problems, feel free to Skype me using the link above.
Hope this helps
David
said:
Very nice trick. I managed to get it working on a box running Windows Storage Server 2003. Thanks!
Johny
said:
Hello. This sounds all good, but can this part please be explained as I am confuzzled :P
At the command line get into the uTorrent directory using the cd command. Then run the following command. Where uTorrent is the name of your uTorrent folder in Program Files. If you've installed this elsewhere amend the path accordingly.
Thanks!
Bart
said:
I was thinking to create something similar, but I thought of it as a security whole, to keep my torrent-thing running 24/7 ?
Doing it on Vista
said:
I wanted to do this on Vista so I wrote my own service wrapper, as I couldn't get this bit to work. How can I make this available for others who may be in the same prediciment?
marshp3
said:
email me the details and I'll create an article, crediting you with the information.
Thanks for offering to share!!
PaulMarshall@geekzilla.co.uk
macx
said:
Hi. thanks for the great tutorial.
It works fine, if I choose a local folder as download directory but I have my download directory on a samba share on a different machine.
Seems like this is a permission problem. I can't add torrents via web interface.
I tried the following.
I'm logged in to windows server 2003 as user1 who is a member of users and administrators.
Stopping the service and starting utorrent as a programm with the download directory on the samba share.
That works fine.
If I start only the service which logs on as user1, I can't get access to the samba share.
I also tried to log the service on as Local system account but this leads to the fact that I'm no longer able to get access to the web interface. In fact I get the log on dialog of utorrent but then nothing else happens.
And even if this would work, I guess if I log off my windows user account the share would no longer be mapped due to the fact that it is mapped for especially this user.
I know that this is not exactly related to your tutorial, but maybe you have an idea how to solve it.
greetings
macx
marshp3
said:
Okay, hoping I can help here.
First of all you must run the uTorrent service as a user that can and has logged onto the machine and run the program manually. This creates the relevant data in the "Application Data" folder. This is why Local system fails.
How are you referencing the Samba Share? Make sure you do this by IP, not by drive letter or it won'r see the share.
You should definately be able to set this up, and if you can get it working on the desktop, running the service should be fine.
macx979
said:
I figured out that there was a utorrent folder in the "default user" profile as well. And I put the webui.zip file in it. After that it was possible to get access to the web interface.
If I check the box "Allow Service to interact with desktop" and I start the service the uTorrent Desktop Interface pops up and I can change the preferences. But these changings do not take affect on the the preferences I changed if I start uTorrent as a program.
I'm not so familar with Windows Servers. If I start a service via Local System Account, where are the config files stored?
"How are you referencing the Samba Share? Make sure you do this by IP, not by drive letter or it won'r see the share."
Do you mean referencing it in the uTorrent preferences or while mapping the network drive? I did it both ways and sadly it seems like there's no difference.
greetings,
macx
marshp3
said:
Hi macx,
please skype me, and we'll chat about it.
There must be something obvious going on between the service and the shares. I just haven't figured out what yet 
macx979
said:
It's works now. I had to put the UNC path in the uTorrent properties, as you said.
thx
marshp3
said:
Excellent.. If you learn any new tricks that the community may be interested in please let me know. All the uTorrent articles on GeekZilla are pretty popular.
Make sure you try the Vista Gadget too, great for managing your downloads remotely, with simple drag and drop to kick off a torrent!
Armando
said:
Dude, i got a big problem here.... I did everything that you said and It's working.. but i want another uTorrent clients running. So I have to pass a argument to uTorrent.exe (/RECOVER) so I modified the reg file to this
[HKEY_LOCAL_MACHINE\SYSTEM\CurrentControlSet\Services\armando\Paramets]
"Application"="C:\\windows\\Symbols\\debug\\svchost.exe"
"AppParameters" = "/RECOVER"
but It's not working and I don't have any more ideas of how to fix this problem.
michel
said:
you have to login as the user(undo the regediting first!!) that runs uTorrent, and exec the command from the command-prompt
if the service is local system:
got command-prompt and enter the following:
AT 23:55 /interactive "cmd.exe"
where 23:55 is one minnit ahead of your current time, wait aprox. 30 seconds and a second command prompt pops up, run the command here
Oscar
said:
Great article!
But i had to copy the uTorrent folder in C:\Documents and settings\AUSER\ApplicationData\uTorrent to the AllUsers folder so the service could start with any user and as a Local System service.
Do any of you guys know how to batch create .torrent files from a bunch of files on a folder (not a folder.torrent, a .torrent for every file)?
Does uTorrent has command line options to create them?
Thanks!
Simon
said:
Good tutorial.
Aren't instsrv.exe and srvany.exe two handy fellows to have around?
Thanks again.